
The following documentation outlines the step-by-step process for creating, managing, and editing Salesforce tasks within the Qualitia Salesforce project. This guide provides detailed instructions on how to initiate, configure, and finalize Salesforce tasks, as well as handling specific operations like editing, verifying, and handling multi-user scenarios. The process ensures efficient management of Salesforce tasks and integrates seamlessly into the Qualitia test automation platform.
📚Prerequisites
-
At least one SFDC project must be created.
-
At least one Connection must be created.
Manage SFDC Task
Create SFDC Task
-
Login to Qualitia Boson - Client.
-
Access Task from left navigation of your SFDC project interface.
-
Click Task Editor to manage and create tasks.
-
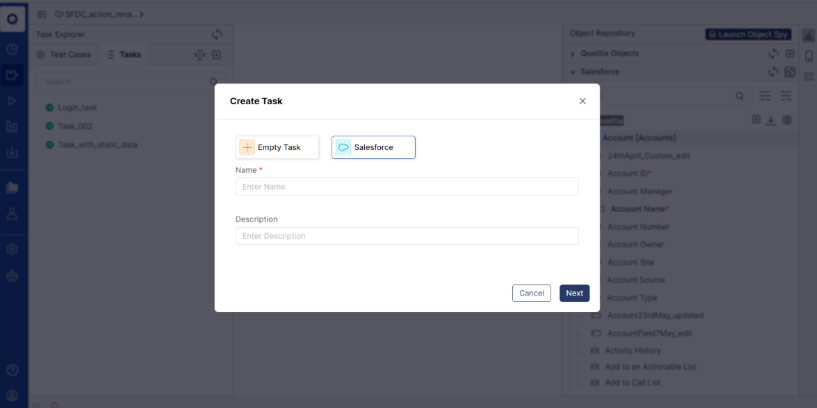
Click Create Task (+) to open the Create Task window.
-
The following options will be presented:
-
Empty Task
-
Salesforce (Select this option for SFDC tasks).
-
-
-
In the Create Task window, provide the following:
-
Task Name: Enter a unique name for the task.
-
Task Description: Optionally, provide a description of the task.
-
-
Click Next to proceed to the next step of task configuration; else, click Cancel.
-
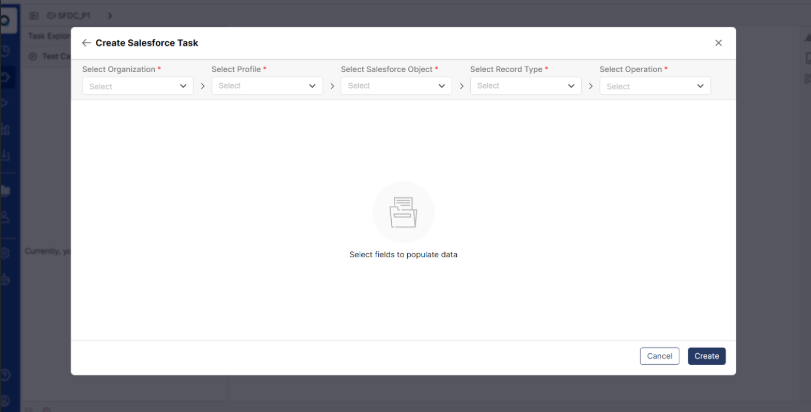
On the Create Salesforce Task popup window, the Salesforce organization will be selected by default.
-
Update the following fields after clicking next:
-
Select Profile: Choose the associated profile.
-
Select Salesforce Object: Choose the Salesforce object (e.g., Account, Lead) you wish to work with.
-
Select Record Type: The system will automatically select the default record type, but you can change it.
-
Select Operation: Choose the operation type from the following options:
-
Create (default)
-
View
-
-
Click Next to continue; else, click Cancel.
-
-
After configuring the above parameters, the fields for the selected object and record type will be displayed. The mandatory fields will be selected by default. Choose the non-mandatory fields to include in the task by checking the corresponding checkboxes.
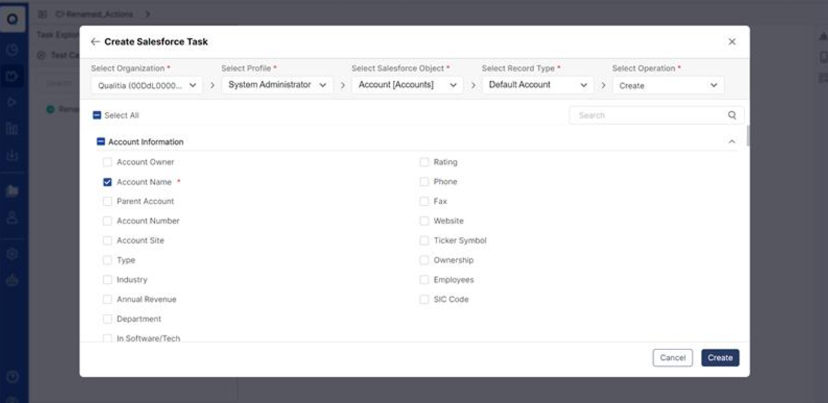
Note: Use the search field to find specific fields quickly. The search is enabled after selecting all dropdown options. -
After configuring the task and selecting the necessary fields, click Create to finalize the task.
-
The task will be created and added to the Task tab with the selected fields, objects, operations, and parameters.
-
In the Qualitia SFDC task creation window, the sections displayed may differ from those shown on the Salesforce instance for the selected Record Type. While additional sections might appear in Qualitia that are not visible on the Salesforce UI, the fields within these sections are presented in the same order as they appear in the Salesforce API.
-
Using the Save As option, users can now save a Salesforce (SFDC) task as a Salesforce task, preserving all Salesforce-specific features and fields.
🔄Edit
-
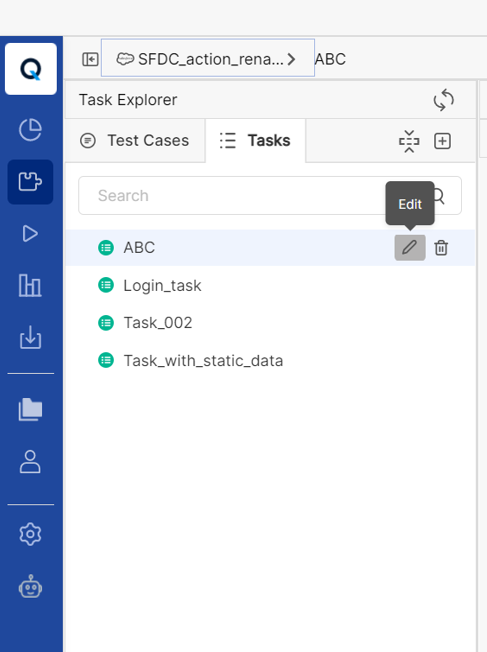
You can edit the task at any time by clicking the Edit icon next to the task.
-
Modify the task name, description, or fields as necessary.
-
If the task is used in multiple test cases, a popup will appear showing impacted test cases.
-
After editing, click Save to store the changes.
❌ Delete
-
To delete a task, click the Delete icon next to the task name.
-
A confirmation popup will appear if the task is used in test cases, showing the impacted test cases. Choose to confirm or cancel the deletion.
SFDC Task Usage in Test Cases
-
If the SFDC task is used in a test case, the hierarchy (organization, profile, Salesforce object, record type, operation) will be displayed below the task name.
-
You can also create SFDC tasks directly from the Test Case Editor by selecting the Create Task option. Follow the same process for configuration.
Handling Mandatory Fields
-
Some fields are mandatory for task creation. These will be preselected once you choose the SFObject. If a task name is not entered or is already in use, error messages will be displayed.
-
Enter Task Name: Error message if the task name is missing.
-
Task Name Already Present: Error message if the task name is already taken.
-
Switching Between Operations
-
When switching operations (e.g., from Create or View), a confirmation popup will appear. If confirmed, all previously selected fields will be reset.
-
Only mandatory fields for the selected operation will be automatically selected.
Multi-User Scenarios
-
If two users attempt to create the same task simultaneously with the same name, the system will detect a name conflict.
-
The user who clicks Create first will succeed, while the second user will receive a prompt with a suggested unique name (e.g., "Task Name_1").
Task Edit/Verify Operation
-
To edit or verify fields, the Edit or Verify operation can be selected from the Select Operation dropdown.
-
The following screens will appear:
-
Fields to Add: Select the fields for updating or verifying.
-
Selected Fields: The fields selected for update or verification will be displayed.
-
-
Users can move fields from the left pane (fields to be added) to the right pane (selected fields) using the right arrow.
-
Fields can also be removed or reordered in the right pane using left arrows and up/down arrows, respectively.
Error Handling and Validation
-
During the task creation process, various validations will be in place to ensure task details are correct:
-
Missing task names will trigger an error.
-
Duplicate task names will prompt an error message and provide an option to modify the name.
-
This documentation provides a comprehensive guide for users to efficiently create, manage, and edit Salesforce tasks in Qualitia SFDC projects, with all necessary steps, error handling, and validation checks included to streamline task management.