
Jenkins Integration
Qualitia Automation Studio (QAS) supports Jenkins, an open-source automation server written in Java. It is a cross-platform, continuous integration, and continuous delivery application that increases your productivity.
You can integrate Qualitia to execute test cases through Jenkins.
📚Prerequisites
In order to push results, the machine which you are using to trigger the test case execution must have access to the machine where Qualitia Server is installed.
You must have access to port 8887 from the machine where Qualitia Server is installed.
Qualitia must be installed.
Projects, Testcases, and Suites must be created in QAS - client.
Testcases must be in Published state.
Jenkins Installation
Jenkins can be installed using following two methods. However, Qualitia recommends installing Jenkins using the war file.
Installing Jenkins using war File
Install JDK 1.6, 1.7.
Do one of the following:
If Java_Path is not added as Enviornment Variable: Open the Command Prompt window, navigate to the folder where you have downloaded JDK 1.6, 1.7, and then navigate to the folder where you have downloaded Jenkins.
If Java_Path is added as Enviornment Variable: Open the Command Prompt window and navigate to the folder where you have downloaded Jenkins.
Execute the following command:
java -Dhudson.model.DirectoryBrowserSupport.CSP="default-src 'self';img-src 'self'; style-src 'self' 'unsafe-inline'; child-src 'self'; frame-src 'self'; script-src 'self' 'unsafe-inline'; frame-ancestors 'self';" -jar jenkins.war.
Default port is 8080.
Installing Jenkins as a Service
Install JDK 1.6, 1.7.
Download and Install Jenkins following the onscreen instructions.
Once the installation process is completed, open the location where Jenkins is installed.
Open the jenkins.xml.
- CODE
Update the argument for %Base%\jre\bin\java as follows:
-Dhudson.model.DirectoryBrowserSupport.CSP="default-src 'self';img-src 'self'; style-src 'self' 'unsafe-inline';
child-src 'self'; frame-src 'self'; script-src 'self' 'unsafe-inline'; frame-ancestors 'self';"
 Do not remove the existing value. Just add to the existing value as displayed in the image above.
Save and close the file.
 Restart the Jenkins service once you update the XML values from the Services.msc console.
Jenkins Configuration
Once you have installed Jenkins, you can proceed for Jenkins configurations.
Launch Jenkins Instance.
Enter the Administrator password.
Take the Administrator password from the initialAdminPassword file located in the .jenkins\secrets folder.Click Continue.
Click New Item on left-hand side to create a New Jenkins job.
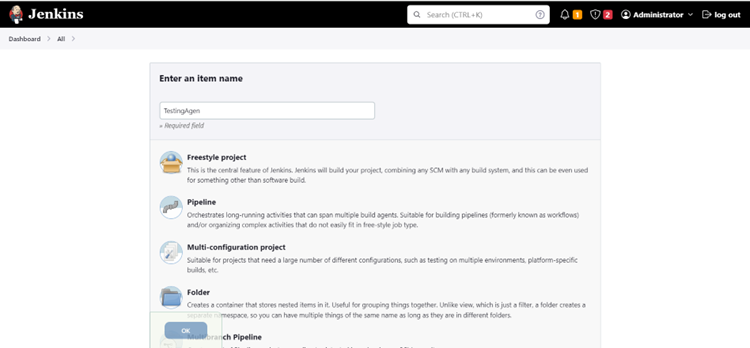
Click OK to go to the Configuration page.
To configure enter the Job Description under General settings.
Now set up the build steps, go to the Build Steps tab
Click Add a build step.
If you are using a Windows machine, select Execute Windows batch command.
In the Command text box, enter the command to execute qualitia-offline.xxxx.jar.
For HTTP, enter
curl -o executionAgent.jar -LJ http://domain.name/api/v1/download/executionAgentFor HTTPS, enter
curl -k -o executionAgent.jar -LJ https://domain.name/api/v1/download/executionAgent
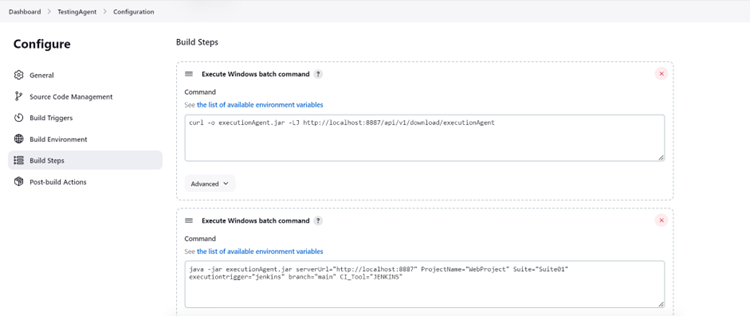
First command hits Qualitia Bot API endpoints to generate a executionAgent.jar. This jar is bridge between CI tool (in this case Jenkins) and Qualitia Server for provided server URL.
In second command, utilize this bridge and provide arguments to access required artifacts.
The required parameters are:
ServerUrl: The server URL where your server is hosted.
ProjectName: The name of the project for which you want to execute testcases and suites.
SuiteName: The name of the suite which you want to execute using Jenkins integration.
Executiontrigger: The mode of execution that you want to trigger from Jenkins.
You can provide any arguments using this command like browser, driver path, polling interval etc.
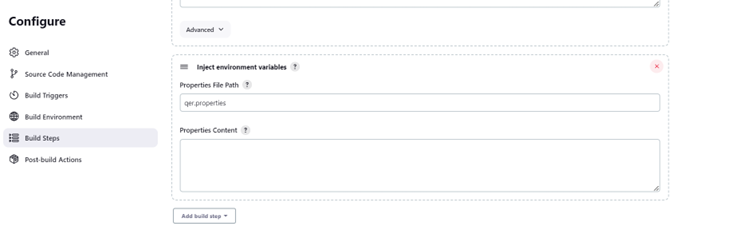
During the execution, Qualitia engine creates a property file qer.properties which will help you to read report in CI/CD.
Make sure to install Inject environment variables plugin to read this file. Once you install this plugin, select Inject environment variables option in Build Steps.
Provide a complete path of qer.properties.
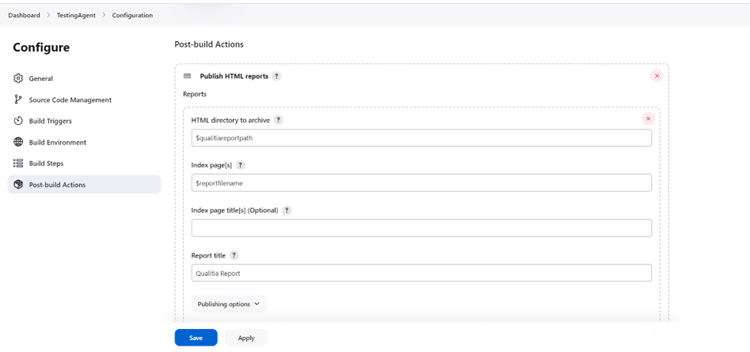
Next step is to set up Post-build Actions to get an execution report.
Go to Post-build Actions and click Add post-build action.
To publish execution report, install Publish HTML Reports plugin.
Select Publish HTML Reports option.
Add values we read from qer.properties in previous step.
To publish the report.
HTML directory to archive: Enter the HTML directory path where report exists. Provide variable present in qer.properties for HTML directory where report exists.
Index page[s]: Enter variable reportfilename in qer.properties. This is the page users want to publish.
Report title: Provide any name of your choice for the file.
Click Apply and then save the data by clicking Save.
Once the setup is done. Click Build Now.
If the job is successfully executed, it will publish a report in Jobs.
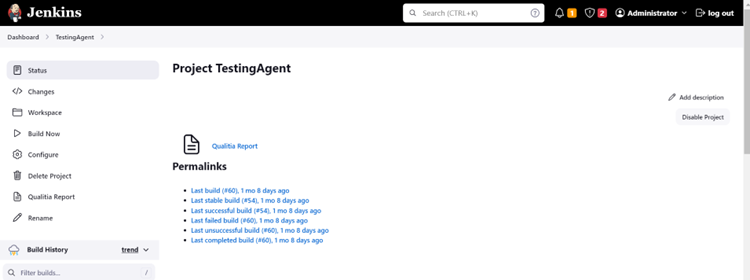
Download the Zip file and take a glance at it. It downloads all the supported files for reports as well.
You can also view the complete build history in the left pane under Build History.
Jenkins Execution Commands with Environment Sets
This section provides curl commands to trigger test execution using environment sets in a CI/CD pipeline such as Jenkins.
Prerequisites
At least one project (Web, Mobile, SFDC, or Desktop) must be created in Qualitia.
At least one environment variable must be defined in the project.
Execution Command Format
In your CI/CD tool (e.g., Jenkins), use the following commands to download the execution agent and trigger test execution.
📌 Multiple Suites with Mapped Environment Sets
curl -k -o executionAgent.jar -LJ https://domain.name/api/v1/download/executionAgent
"C:\Program Files\Zulu\zulu-21\bin\java.exe" -jar executionAgent.jar serverUrl="https://domain.name" ProjectName="projectname" Suite="Suite1&Suite2" suitesEnvSet="Suite1-Set1, Suite2-Set2" executiontrigger="jenkins" branch="main" CI_Tool="Jenkins"
Description:
Executes suites Suite1 and Suite2, using environment sets Set1 and Set2, respectively.
📌 Single Suite with Environment Set
curl -k -o executionAgent.jar -LJ https://domain.name/api/v1/download/executionAgent
"C:\Program Files\Zulu\zulu-21\bin\java.exe" -jar executionAgent.jar serverUrl="https://domain.name" ProjectName="projectname" Suite="Suite1" suitesEnvSet="Suite1-EVSET" executiontrigger="jenkins" branch="main" CI_Tool="Jenkins"
Description:
Executes suite Suite1 using the environment set EVSET.
Execution Using User-Based Environment Set Mapping
When executing a suite via CI/CD, if only the user information is provided in the command, Qualitia will automatically pick and execute the suite(s) using the Environment Variable (EV) Set mapped by that user to the selected suite.
Use the following command:
curl -k -o executionAgent.jar -LJ https://domain.name/api/v1/download/executionAgent
"C:\Program Files\Zulu\zulu-21\bin\java.exe" -jar executionAgent.jar serverUrl="https://domain.name" ProjectName="CBI" Suite="Suite1" executiontrigger="jenkins" branch="main" CI_Tool="Jenkins" envSetMappingUserId="UserName"
Replace
"UserName"with the actual Qualitia username.Before running the command, ensure that:
The environment set is published (shared).
The environment set is correctly mapped to the suite being executed.
🔁 Syntax Format
Use the following format to map suites or test cases to environment sets:
suitesEnvSet="SuiteName-SetName"testcasesEnvSet="TestcaseName-SetName"envSetMappingUserId= "UserName"
If no environment set is explicitly selected, execution defaults to the Default Set.
Only shared environment sets can be used for execution. If you choose the local set during CI/CD execution, the execution will proceed using the default set instead.
Execution will fail if a local environment set is referenced in the command.
🔧 Got a problem? Let’s fix!
Unable to view Qualitia Suite Execution Summary Report in Jenkins
Problem: After an offline suite is executed using a Jenkins Job, the associated suite execution report is not displayed in Jenkins Reports.
Description: When you open the published suite execution report in Jenkins, you see any of the following behavior:
A blank page opens
The following message is displayed:
“You need to enable JavaScript to view this”
Solution 1:
You need to set up the content policy in Jenkins.
Perform the following steps:
Open the Jenkins Server.
Click Manage Jenkins >Manage Nodes.
Click the Settings icon for the node that you are using (Master node by default).
In the node page, select the Script Console option in the side menu.
In the script console, enter the following command line: System.setProperty("hudson.model.DirectoryBrowserSupport.CSP", "default-src 'self' 'unsafe-inline';")
Click the Run button below to this console, and you should see the Result: with the above values printed.
Note: If you don’t see it in the first attempt, then retry this step.
You can now see the suite execution summary reports.
Solution 2:
The report does not load as by default the JavaScript is disabled in the latest version of Jenkin's.
Therefore, if Solution 1 does not work and the inline script fails to bypass the Content Security Policy (CSP), the alternative method is to enable the Chrome extension for CSP.
Steps to enable the Crome extension for CSP:
Open the Crome browser.
Navigate to Extensions and add https://chromewebstore.google.com/detail/disable-content-security/ieelmcmcagommplceebfedjlakkhpden?utm_source=ext_app_menu.
Adding this extension will disable the Content Security Policy, and you will be able to view the execution report.
📞📚 Here to Help: Support and Resources
If you have questions that are not addressed in the documentation, you may raise them in the Qualitia Community.