Bitbucket
Bitbucket is Atlassian's web-based version control repository. You can use Qualitia with Bitbucket as a version control system for your Qualitia test artifacts. In order to do so, you must install and configure Git client on your Windows machine.
Prerequisites for Bitbucket Integration
In order to use Bitbucket as your version control tool for Qualitia artifacts, you must have:
An active Atlassian account to use Bitbucket
Read and Write access to the repository in which you want to add Qualitia projects or from which you want to access Qualitia projects.
Preparing Local Git Environment
Setting Up Environment Using SourceTree (Recommended)
Setting up an environment is a one-time activity. After the setup is completed, all the changes made to the test cases and tasks are automatically managed in the Bitbucket repository.
SourceTree Installation and Configuration
At the end of this topic, Qualitia admin user will be able to install and configure Sourcetree.
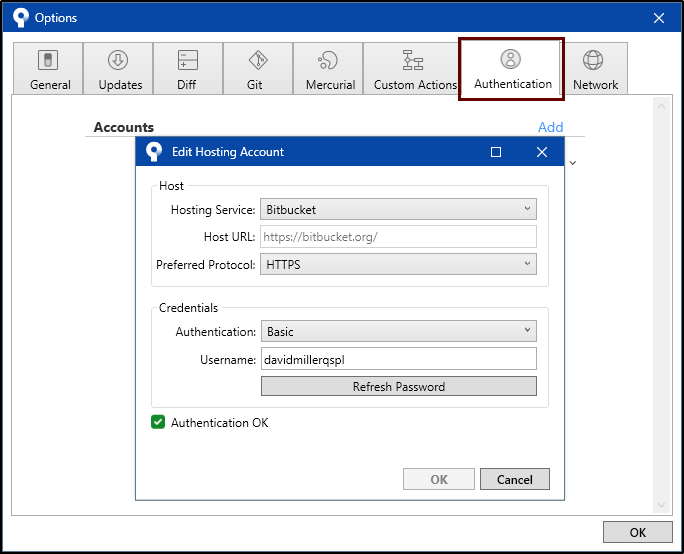
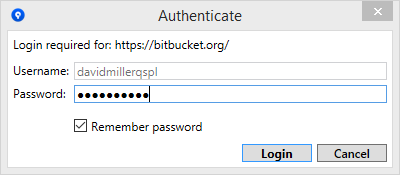
Install SourceTree and Configure CredentialsIn order to start working with your Bitbucket repositories, you must first install and configure sourceTree.
|
Creating a Repository for Qualitia Projects
After you configure SourceTree, you can now create a repository on the local system.
These steps should be performed by Bitbucket administrator who is responsible for creating and maintaining Bitbucket repositories.
To create a repository:
Launch SourceTree.
Click Create.
In the Destination Path, select a folder path where you would like to save and work on your local repository.
Enter the preferred repository name. Repository name should not contain white spaces.
Select GIT. Qualitia supports GIT repositories only. Support for Mercurial is not yet added.
Select the Create Repository on Account option.
In Repository Settings, Bitbucket account details appear that are added while configuring SourceTree.Add Description, if required.
Select Is Private option to mark this repository as a private repository. Keeping repositories private enables you to control who can access and update data from your repository. This is important to avoid discrepancy in the project data.
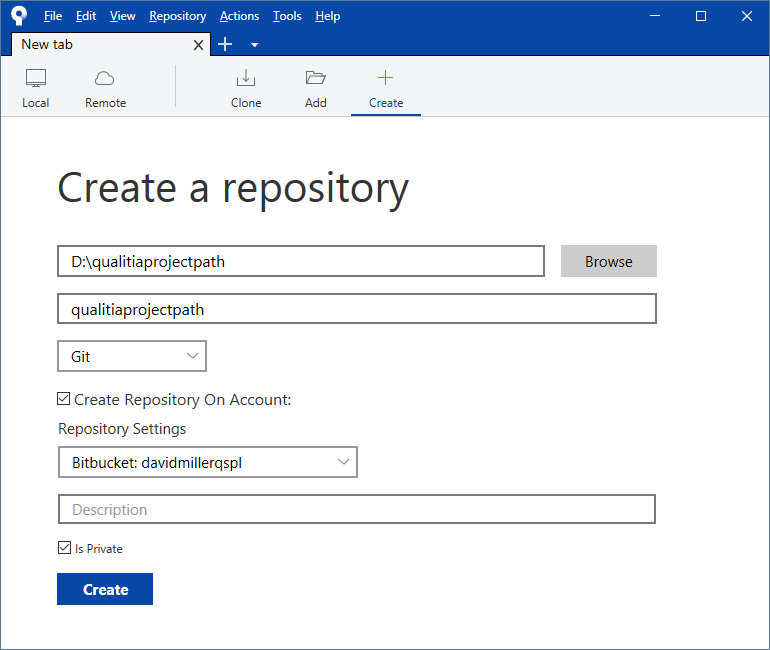
After the repository is created, add a sample text file into the repository and commit it.
To commit sample file,
Navigate into the folder where you have created the repository on the local system.
Create a new sample.txt file with sample text in it.
From SourceTree, stage the file and add comment, if required.
Select Push changes immediately option and click Commit.
This is a one-time activity for each repository you create on Bitbucket. Commiting sample file is mandatory for creating new branches into the repository to add Qualitia project data.
Adding Existing Qualitia Projects to Bitbucket Repository
After you clone the repository, you can now add your existing Qualitia projects to the Bitbucket repository.
This is a one-time activity for each of the existing Qualitia project. Once the project is added to the repository, all the changes made to the repository are automatically updated by Qualitia. This activity has to be performed by Qualitia Admin user.
At the end of this topic, Qualitia user will be able to add existing Qualitia projects to the bitbucket repository.
To add existing projects to Bitbucket repository:
Navigate into the folder where you have cloned the repository.
Move your existing project folder (<ProjectName>_projectdb) to this location.
You can get this folder at the location specified in Setting> Configuration Setting > Dependency > Project Path.Launch SourceTree.
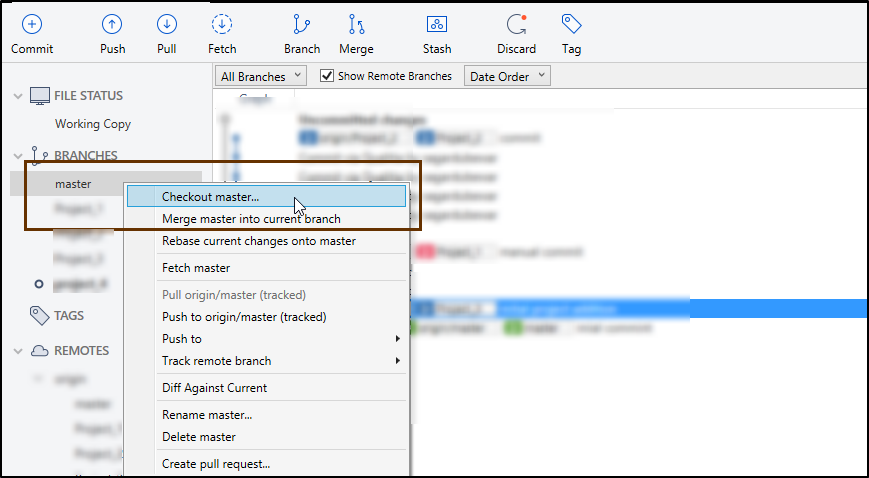
On the left hand side, expand Branches and then Checkout master branch.
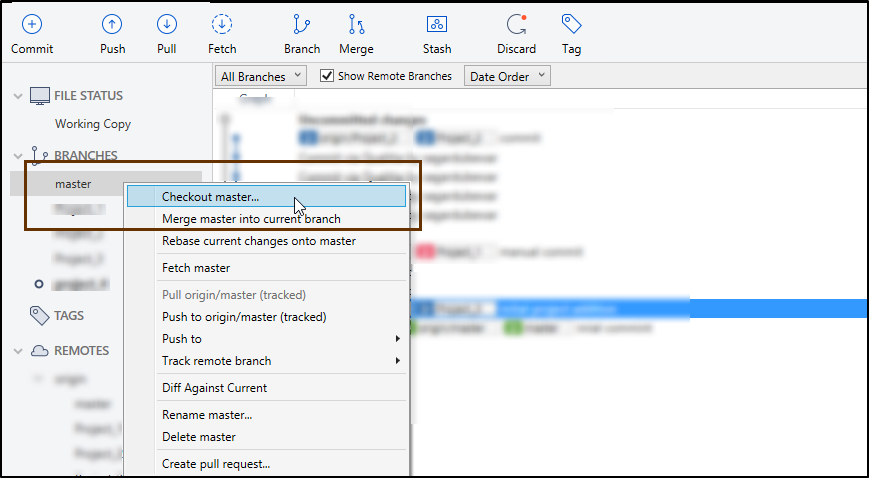
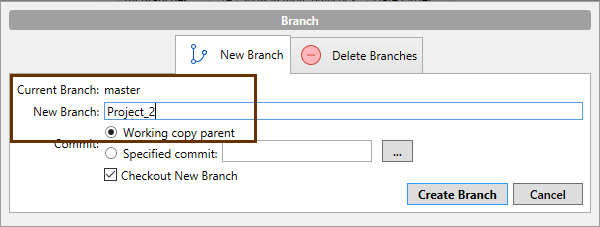
Create a new branch with your Qualitia Project name.
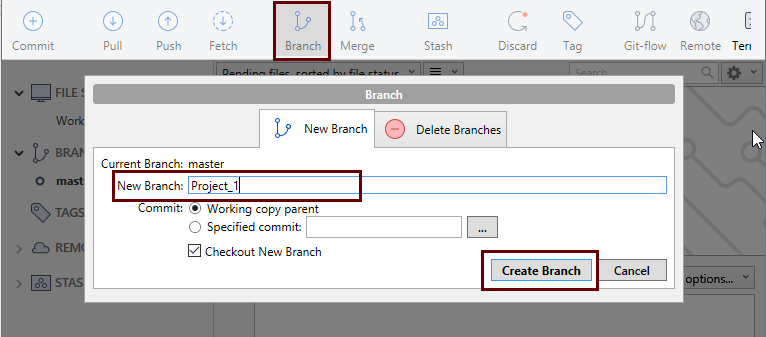
To create a new branch:Click Branch > New Branch.
Enter New Branch name.
Ensure that Checkout New Branch option is selected.
Click Create Branch.
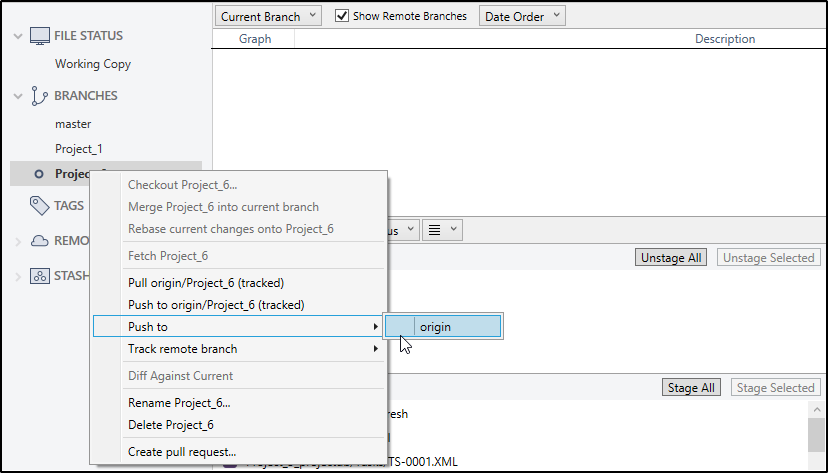
After creating a branch, right-click the branch and select Push > Origin.
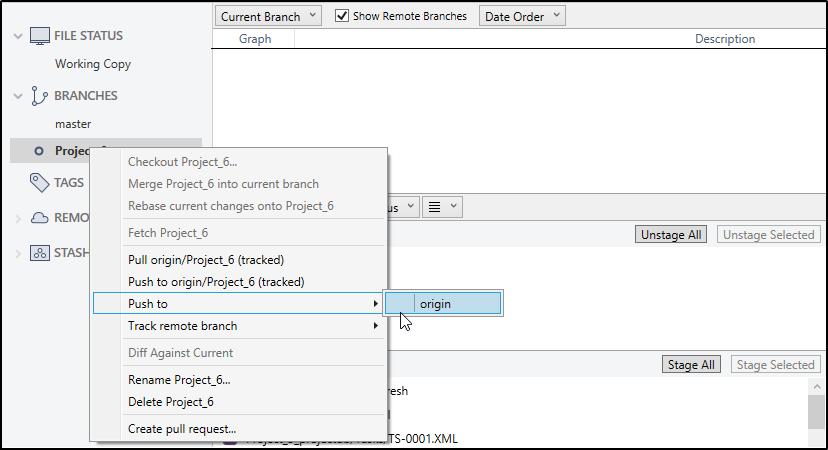
Stage all files except (.gitrefresh) and add comments, if required.
The .gitrefresh file is generated and used by Qualitia for the internal purposes. Please do not add this file into the remote repository while adding your project artifacts.
Select Push changes immediately option and click Commit.
Now copy the directory path of the repository (from local system) and set it as Qualitia Project Path (in Configuration Setting > Dependency).
Also, in Configuration Setting > General, select Version Control as GIT and add Bitbucket username and password.
Restart Qualitia to start working on the projects that are integrated with Bitbucket repository.
Creating New Projects
When you are working with Qualitia projects that are integrated with Bitbucket repository, you need to create a branch in Bitbucket repository before creating new Qualitia projects.
To create new branch in Bitbucket repository:
|
Cloning Repository and Checking-out First Qualitia Project
You can start working on the Qualitia projects which are already added to the Bitbucket repository by other Qualitia user. In order to do so, you need to clone the corresponding repository and checkout corresponding projects on local system.
At the end of this topic, Qualitia users will be able to clone the repository and checkout the desired Qualitia project.
To start working on existing Qualitia projects from Bitbucket:
Prerequisites:
SourceTree v2.6.10
Valid Atlassian account for using Bitbucket
Qualitia Client
Read and Write access to the repository in which Qualitia project exists
Access to Qualitia project which you want to work on
Clone Bitbucket Repository and Checkout Project
After the initial setup and SourceTree configuration, you can clone the Bitbucket repository and checkout Qualitia projects on your local system.
In case you want to work on multiple Qualitia projects, you need to checkout multiple projects one-by-one.
To clone the repository and checkout Qualitia project:
Launch SourceTree.
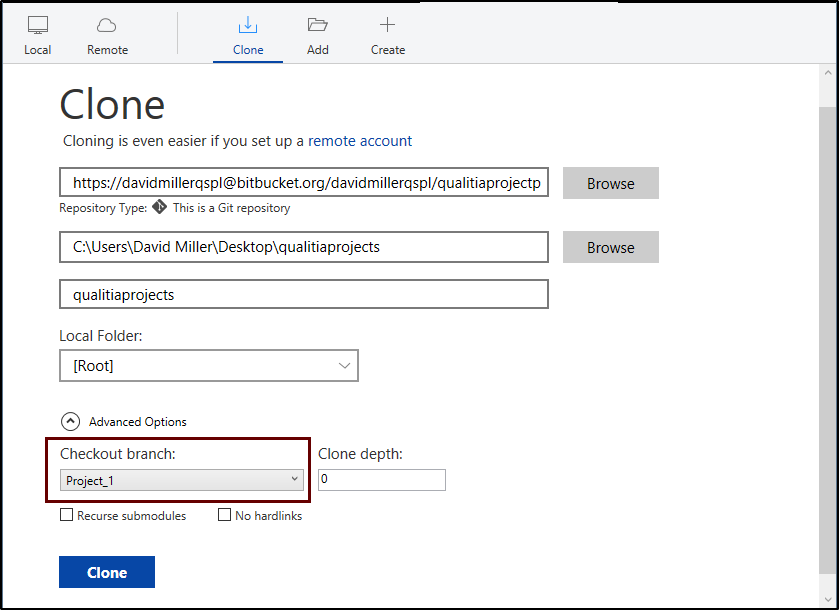
From the top section, click Clone.
Enter Source Path / URL.
This is the Bitbucket repository URL.
To get the correct URL, go to bitbucket.org > Select Repository Name > from the right-top corner, click Clone.In the Destination path, select a folder path where you would like to save and work on your local repository.
Enter the preferred repository name.
In Checkout Branch, select the Qualitia project you want to start working on.
Click Clone.
After you clone, copy the Bitbucket repository path from the local system and add it as a Project Path (in Configuration Setting > Dependency).
Also, in Qualitia Configuration Setting > General, select Version Control as GIT and add Bitbucket username and password.
Restart Qualitia and start working on the Qualitia Projects integrated with Bitbucket repository.
Getting New Qualitia Projects from Remote Repository
In case you already have the repository cloned at your system and now you want to get new Qualitia project to work on, you need to checkout these projects from the remote repository.
To checkout new Qualitia projects:
Launch SourceTree.
In the Remote section, select the project you want to work on.
Right-click and select Checkout origin/<ProjectName>
This will checkout the project folder (<ProjectName_projectdb>) into your local repository.
You can now start working on the newly checked-out Qualitia project.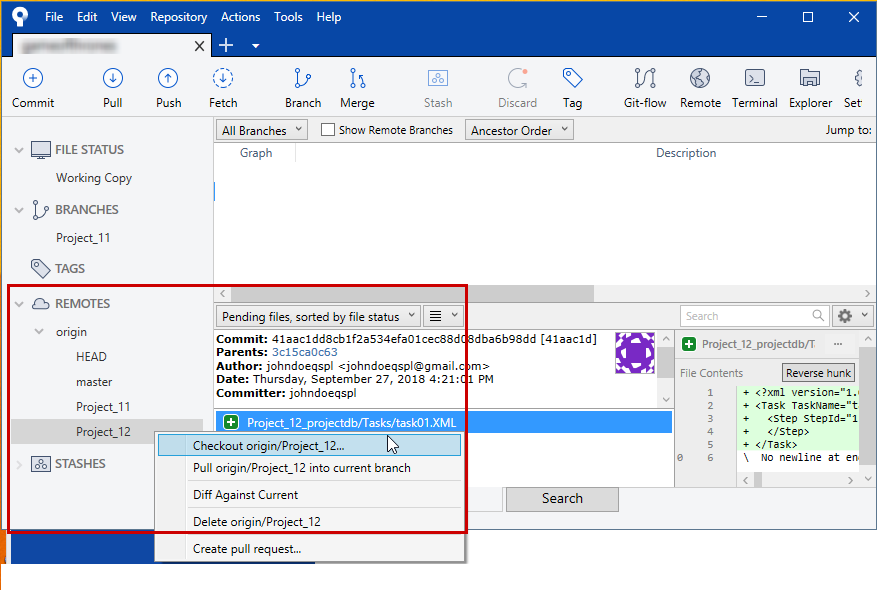
Setting Up Environment Using Git Bash
Installations and Configurations
GIT Client Installation
Bitbucket is a version control system. You can use Bitbucket to store and manage your Qualitia projects. Before you start working with Bitbucket from Qualitia, you need to prepare your Windows computer.
To install Git client, on your Windows machine:
Update Bitbucket Configuration File
After you install git client, you must add Bitbucket user name and email into the configuration file using command line interface (Git Bash).
To add user details:
Launch Git Bash.
To add bitbucket username, enter the following command and press Enter.
Replace John Doe with your Bitbucket username.CODE$ git config --global user.name "johndoe"To add bitbucket email of the user, enter the following command and press Enter.
Replace email with your email configured with Bitbucket account.CODE$ git config --global user.email "John.Doe@yourdomain.com"
Creating a Repository in Bitbucket
You can create a repository on Bitbucket and add your Qualitia projects to this repository. Bitbucket considers every Qualitia project as a single branch.
To create new repository on Bitbucket:
Log on to your Bitbucket instance.
Click the + icon and create a new repository.
Enter Repository name.
 Repository name should not contain white spaces.
Mark this repository as private selecting the Access Level checkbox.
Select Version Control as Git.
In the Advanced Settings, select Language as XML.
Click Create repository.
You can now add Qualitia projects to this repository. Every single Qualitia project will be considered as different branch.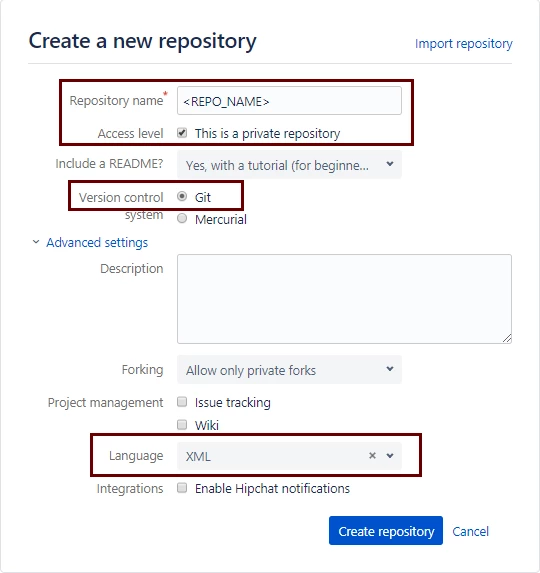
Cloning a Repository
After you create a repository in Bitbucket, you must clone it on your local system to start working on it.
To clone the repository:
Log on to Windows machine where you have installed Qualitia Automation Studio Client.
Navigate to the folder where you want to clone the Bitbucket repository.
Right-click and select the Git Bash Here option.
Enter the following command and press Enter.
CODE$ git clone <Bitbucket repository URL>The repository will be cloned to your local system and you can now add Qualitia projects to this repository.
To get the correct URL, go to bitbucket.org > Select Repository Name > from the right-top corner, click Clone.
Initial Commit
After you clone the repository on your local system, it's time to add files into this repository and create initial commit.
To create initial commit:
Navigate into the folder where you have cloned the Bitbucket repository.
Right-click and select the Git Bash Here option.
Enter the following commands one-by-one to create, add, commit a file into the Bitbucket repository.
CODE$ echo "Earth's Moon" >> locations.txt $ git add locations.txt $ git commit -m "<your comment>"
Adding the Existing Qualitia Projects to Bitbucket Repository
After you clone the repository and completed initial commit, you can now add the Qualitia projects artifacts to Bitbucket repository. This is a one-time activity. The Bitbucket repository adds each project in different branches so that you can track the changes in Qualitia projects artifacts easily.
The Qualitia project must have at least one task and one test case. Empty projects cannot be added to the Bitbucket repository.
To add the existing Qualitia projects to the Bitbucket repository:
Navigate to the folder where you have cloned the repository.
Move your existing project folder (<ProjectName>_projectdb) to this location.
You will get this location in Qualitia Configuration Settings > Dependency > Project Path.Launch Git Bash.
Enter the following command to checkout the master branch before you add a new branch for the project that you want to add into GIT repository. .
CODE$ git checkout masterEnter the following command to add a separate branch in the Bitbucket repository to store the project,
CODE$ git branch <project name>Enter the following command to checkout this newly created branch on the local system.
CODE$ git checkout <project name>Enter the following commands to add the projects artifacts into the Bitbucket repository:
CODE$ git add <project name>_projectdb/Tasks/ $ git add <project name>_projectdb/TestCases/ $ git add <project name>_projectdb/project name_QASJavaproject/Note: Do not add the Environment Variable folder as it differs for every user.
Enter the following commands to add the desktop project artifacts into the Bitbucket repository:
CODE$ git add <project name>_projectdb/Tasks/ $ git add <project name>_projectdb/TestCases/ $ git add <project name>_projectdb/project name_QASJavaproject/ $ git add <project name>_projectdb/project name_QFDCustomActions/Note: Do not add the Environment Variable folder as it differs for every user.
After you add the project artifacts, commit and push the changes to the repository by adding the appropriate comments.
CODE$ git commit -m '<project name> <your comment>' $ git push --set-upstream origin <project name>Now copy the parent directory path in which you have checked-out the project and set it as Qualitia ProjectPath (in Configuration Setting > Dependency).
In the General section, select Version Control as GIT and enter your Bitbucket Username and Password.
Restart Qualitia to start working on the desired projects.
Creating New Qualitia Projects
Before creating new project in Qualitia, you must first create the project branch in the Bitbucket repository.
To create new project branch:
Launch Git Bash.
Navigate to the Qualitia Project path.
You will find this location in Settings> Configuration Setting > Dependency section. Assuming this is the path where you have cloned the repository.Enter the following commands:
CODE$ git checkout master $ git branch <ProjectName> $ git checkout <ProjectName> $ git push --set-upstream origin <project name>Create new project from Qualitia Automation Studio with the same name which you have used to create new branch (as mentioned in the command above).
Cloning Bitbucket Repository and Checking-out First Qualitia Project
You can start working on the Qualitia projects which are already added to the Bitbucket repository by other Qualitia user. In order to do so, you need to clone the corresponding repository on local system.
Prerequisites:
Git Client (v2.19.0)
Valid Atlassian account to use Bitbucket
Read and Write access to the repository in which Qualitia project exists
Access to Qualitia project which you want to work on
To access existing Qualitia project from Bitbucket repository:
Log on to the machine from where you want to work on Qualitia projects.
Install Git Client and Git Credential Manager, if not already installed.
Launch Git Bash.
Update the Bitbucket Configuration file, if not already updated.
CODE$ git config --global user.name "John Doe" $ git config --global user.email "John.Doe@yourdomain.com"Enter the following command to clone the repository.
CODE$ git clone <Repository URL> To get the correct URL, go to bitbucket.org > Repository Name > from the right-top corner, click Clone.
Navigate into the repository and run the following command using Git Bash to get the desired project.
CODE$ git fetch && git checkout <ProjectName>After you clone the repository:
Launch Qualitia Automation Studio.
From the Setting menu, click Configuration Setting > Dependency.
Copy the Bitbucket repository path (from the local machine) and set it as Project Path.
In the General section, update database details with respect to new project which you have cloned from Bitbucket repository, if applicable.
In Version Control, select GIT.
Enter Bitbucket Username.
Enter Bitbucket Password.
Click OK.
Restart Qualitia and start working with the desired project from Bitbucket repository.
Getting New Qualitia Projects From the Remote Repository
In case you already have the repository cloned at your system and now you want to get new Qualitia project to work on, you need to checkout these projects from the remote repository.
To checkout new Qualitia projects:
Navigate into the folder where you have cloned the repository on the local system.
Right-click and select the GIT Bash here option.
Enter the following command to checkout the project branch which you want to work on.
CODE$ git fetch && git checkout <ProjectName>This will checkout the project folder (<ProjectName_projectdb>) into your local repository.
You can now start working on the newly checked-out Qualitia project.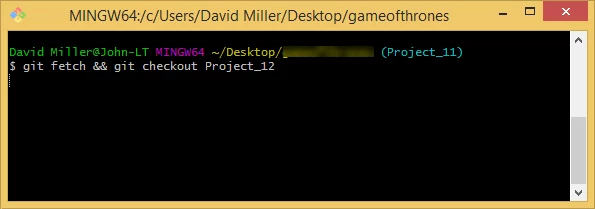
Change Management
Qualitia tightly integrates with the version control systems. We highly recommend using version control integration while you are working in multi-user environments. The complete history of the changes made to Qualitia artifacts such as Test Cases and Tasks are automatically stored and managed in the Bitbucket (Cloud) repository.
Creating/Editing Tasks/Test Cases
When you work on a project which is shared over a Bitbucket repository, multiple users can access test artefacts (test cases or tasks) based on their requirements. Qualitia locks test artefacts in case multiple users try accessing them at the same time to avoid conflicts and overwrites.
The following table illustrates what Qualitia does when a task or test case is created or edited.
When User A | Qualitia | So that |
|---|---|---|
Clicks Test Case ABC to open it | Gets the update for Test Case ABC and all tasks | The latest test is always available to the user. |
Tries editing Task A by adding a step or editing a step (from Test Cases or Tasks section) | Gets task and then locks Test Case ABC and Task A and allows User A to edit | Only User A has exclusive rights to edit Test Case ABC and Task A, thus avoiding change conflicts between multiple users. |
Edits and saves the test case. | Saves the test case and releases the lock. | Changes are updated and available to other users immediately. |
Editing a Task / Test Case
Qualitia validates and opens the latest version of the tasks/test cases while accessing them. Multiple users cannot edit the same task or test case simultaneously. If a user is working on a task, others cannot edit it.
In case any other user tries to edit the task/test case, Qualitia gives the following message:
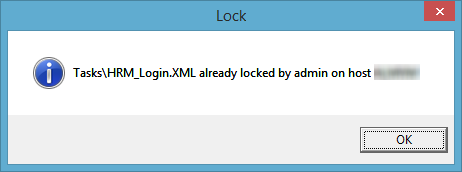
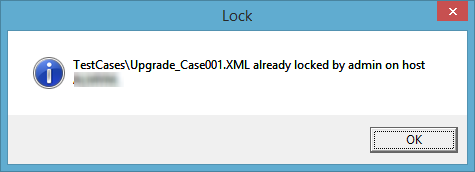
A task/test case can be edited by another user only when the first user saves it and navigates to some other screen. This releases the lock on the task/test case.
Suite Execution
At the time of Suite execution, Qualitia checks if the test cases and tasks from the suite have been modified. The latest version of the test cases is taken for the Suite execution.
In case any test case or task is in the edit mode when triggering the suite execution, the corresponding task or test case is skipped while execution.
Scheduler Execution
When the test suites are executed via scheduler, Qualitia takes latest version of the tasks and test cases for execution.
In case any test case or task is in the edit mode, scheduler execution proceeds with the rest of the test cases.
Reports
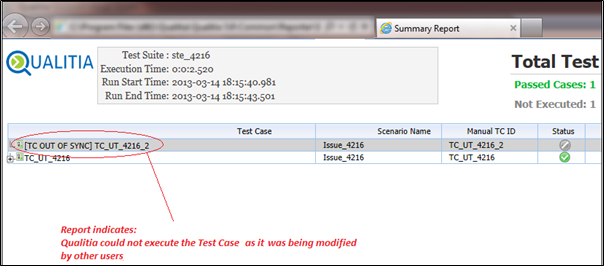
If any user is working on a test case or task while triggering the suite execution, Qualitia cannot access. Such test cases are not executed and are marked with Not Executed status in the suite execution report.
Viewing Change History
You can view the complete history of changes made to Qualitia artifacts, test cases and tasks, in Bitbucket. This gives you ability to trace back every single change made by each and every Qualitia user.
To view change history:
Log on to your Bitbucket account.
Select desired repository.
From the left-side section, click Commits.
This gives you complete history of changes that were made to the repository, shows commit messages, displays which tasks and test cases were changed, and so forth.

Unlinking Project From Bitbucket Repository
You can unlink the Qualitia project from the Bitbucket repository.
To unlink Qualitia project from the Bitbucket repository:
Log on to Qualitia Automation Studio.
From the Setting menu, click Project Setting.
In Version Control, select None.
Click OK.
Restart Qualitia to start working on the desired project.
Changes made to the tasks and test cases will now no longer be pushed to the Bitbucket repository.

