
Salesforce Application (SFDC)
This guide introduces you to a pivotal component of Qualitia Automation Studio (QAS) – Salesforce Application and covers its core features, from the intuitive recording toolbar to the advanced verification steps, mouse hover actions, browser simulations, and the dynamic locator type priority. Let’s discover how the Salesforce application can redefine your test automation experience.
📚Prerequisites
User should have the QAS - Client installed.
Enable the feature flags.
The project needs to be Salesforce.
User should create Connect App in Salesforce.
Switch user composite action configuration need:
If your browser requires manual intervention to allow pop-ups, please add the following runtime capabilities/arguments:
--disable-web-security--allow-running-insecure-content
Establishing Connection with the Salesforce Application
To start using the Salesforce application, you need to first establish a connection between QAS - Client and the Salesforce application you a willing to use.
Follow the below steps to establish the connection:
Login to Qualitia Automation Studio (QAS) - Client.
Access Settings from left navigation to view the Settings screen. On the Settings screen, select Project Configuration.
Expand Project Configuration and click Salesforce to open Salesforce Connections screen.
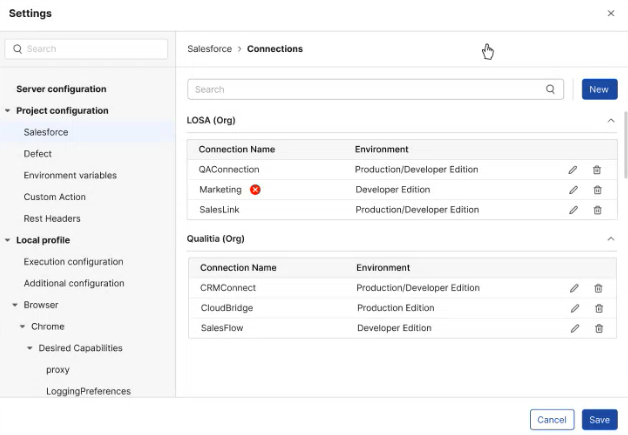
On the Salesforce Connections screen, you can see all the previously established connection, if any, and also search for one by the Connection Name using the Search option.
To create a new connection, click New. This will open the New Salesforce Connection window.
You can establish the connection by choosing one of following:
Login using OAuth: To login using this method enter the below details.

Connection Name: Enter an intuitive name for the connection that is easy to recognize.
Salesforce URL: Enter the Salesforce application URL. It should be a Classic URL.
Client ID: Enter the Consumer Key generated from the Connected App. Refer Create Connected App in Salesforce for more info.
Client Secret: Enter the Consumer Secret generated from the Connected App. Refer Create Connected App in Salesforce for more info.
Login using Salesforce URL:
Connection Name: Enter an intuitive name for the connection that is easy to recognize.
Salesforce URL: Enter the Salesforce application URL. It should be a Classic URL, e.g., https://qualitia6-dev-ed.develop.my.salesforce.com/ .
Username: Enter the username registered with the Salesforce application.
Password: Enter the password for logging into the Salesforce application.
Security Token: Enter the Security Token generated using the Salesforce application. Refer Steps to Generate Security Token for more details.
Environment
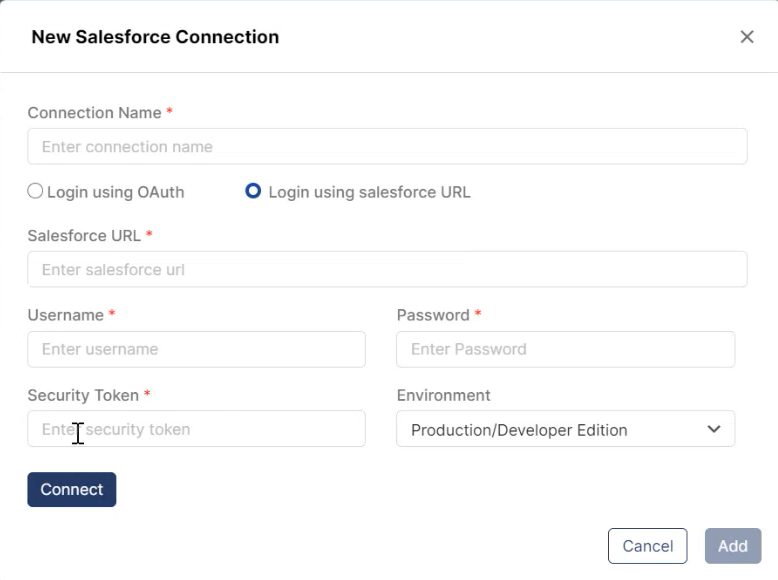
Click Connect.
The Enable Client Credentials Flow checkbox should be checked to establish a successful connection. You will find this option under the API (Enable OAuth Settings) on the Connected App.
After the connection is successful you will see Organization Name above the Disconnect button. The Organization Name will be auto populated once the connection is successful.
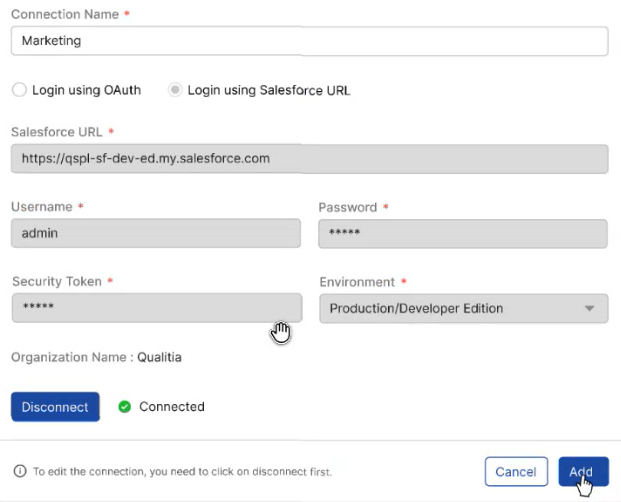
When one user is editing a connection, it is locked for editing or deletion for other users. However, other users can still import objects using the same connection.
Create Connected App in Salesforce
Log in to Salesforce as an administrator.
Click Setup from the upper-right corner of the Salesforce application screen.
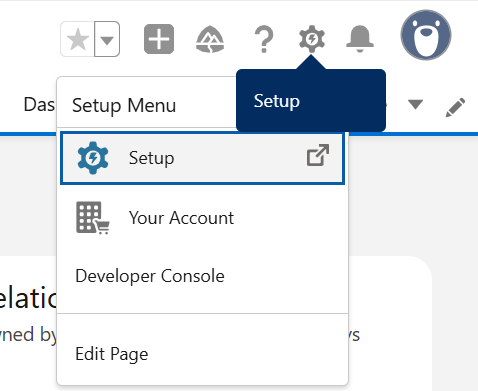
Navigate to App Manager from the left pane and click New Connected App.
Enter the details in the required fields under Basic Information on the New Connected App page.
Connected App Name (e.g., Qualitia Integration)
API Name (e.g., Qualitia Integration)
Note that the API Name will be auto populated as Connect App Name.Contact Email
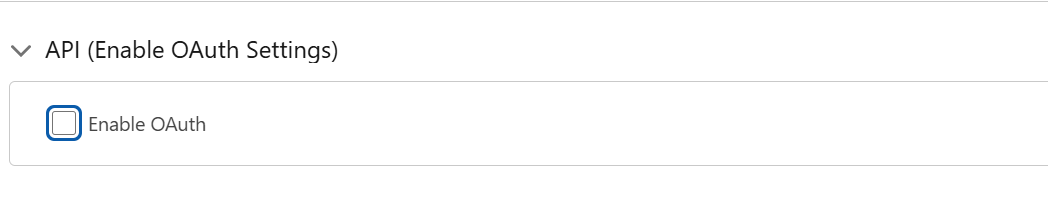
Enable OAuth Settings under API:
CreateSelect Enable OAuth Settings.
Enter https://login.salesforce.com/ in the Callback URL field.
Select Manage user data via APIs (api) in the Selected OAuth Scopes field and click Add.
Click Save to create the new Connected App.
Navigate to the Connected Apps list and click Manage.
On the Manage screen, go to OAuth Policies and click Edit
Under Permitted Users, select All users may self-authorize.
Click Save to save the changes.
Go back to the Connected Apps list and click the App you just created.
In the API (Enable OAuth Settings) section, you will find the Consumer Key and Consumer Secret which will be required for configuring Credentials in Qualitia Integration.
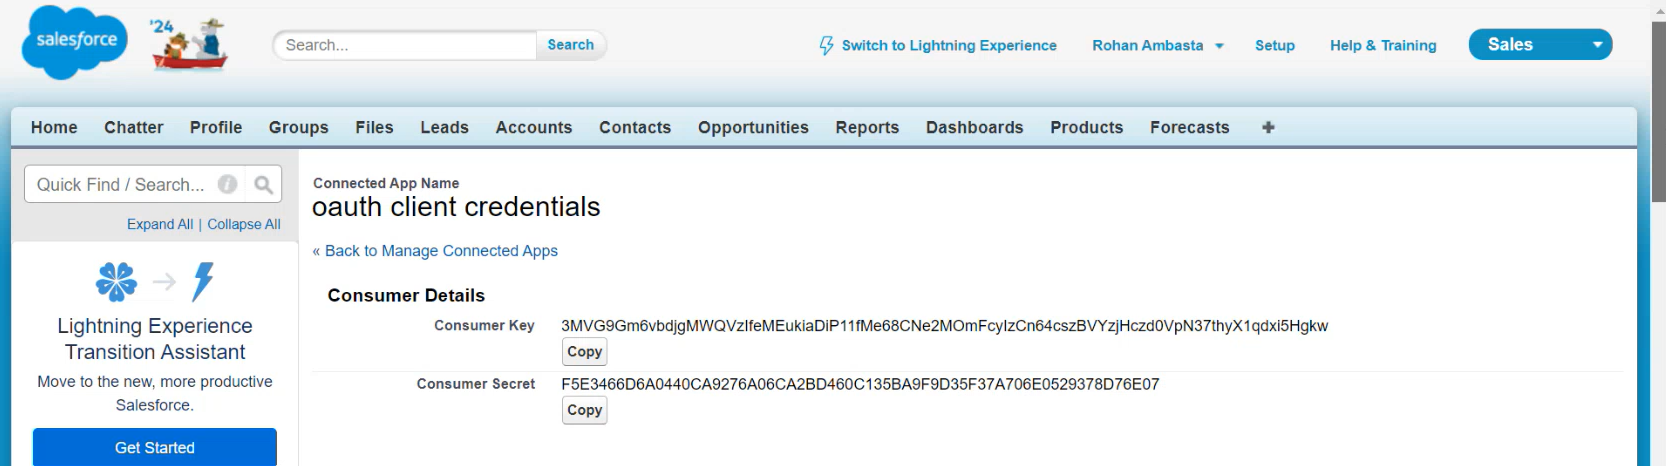
Take a note of the Consumer Key and Consumer Secret for configuring credentials in Qualitia Integration.
If you are unable to import objects with Salesforce connections, adjust the Session Security Level Required at Login setting by either disabling it or setting it to None within the respective user profile.
Steps to resolve:Navigate to Users > Profile in Salesforce.
Go to Session Settings.
Set Session Security Level Required at Login to None.
Creating an External Client App in Salesforce
Follow the steps below to create and configure an External Client App in Salesforce for secure integration.
Log in to Salesforce (e.g. https://login.salesforce.com) using Salesforce Admin credentials.
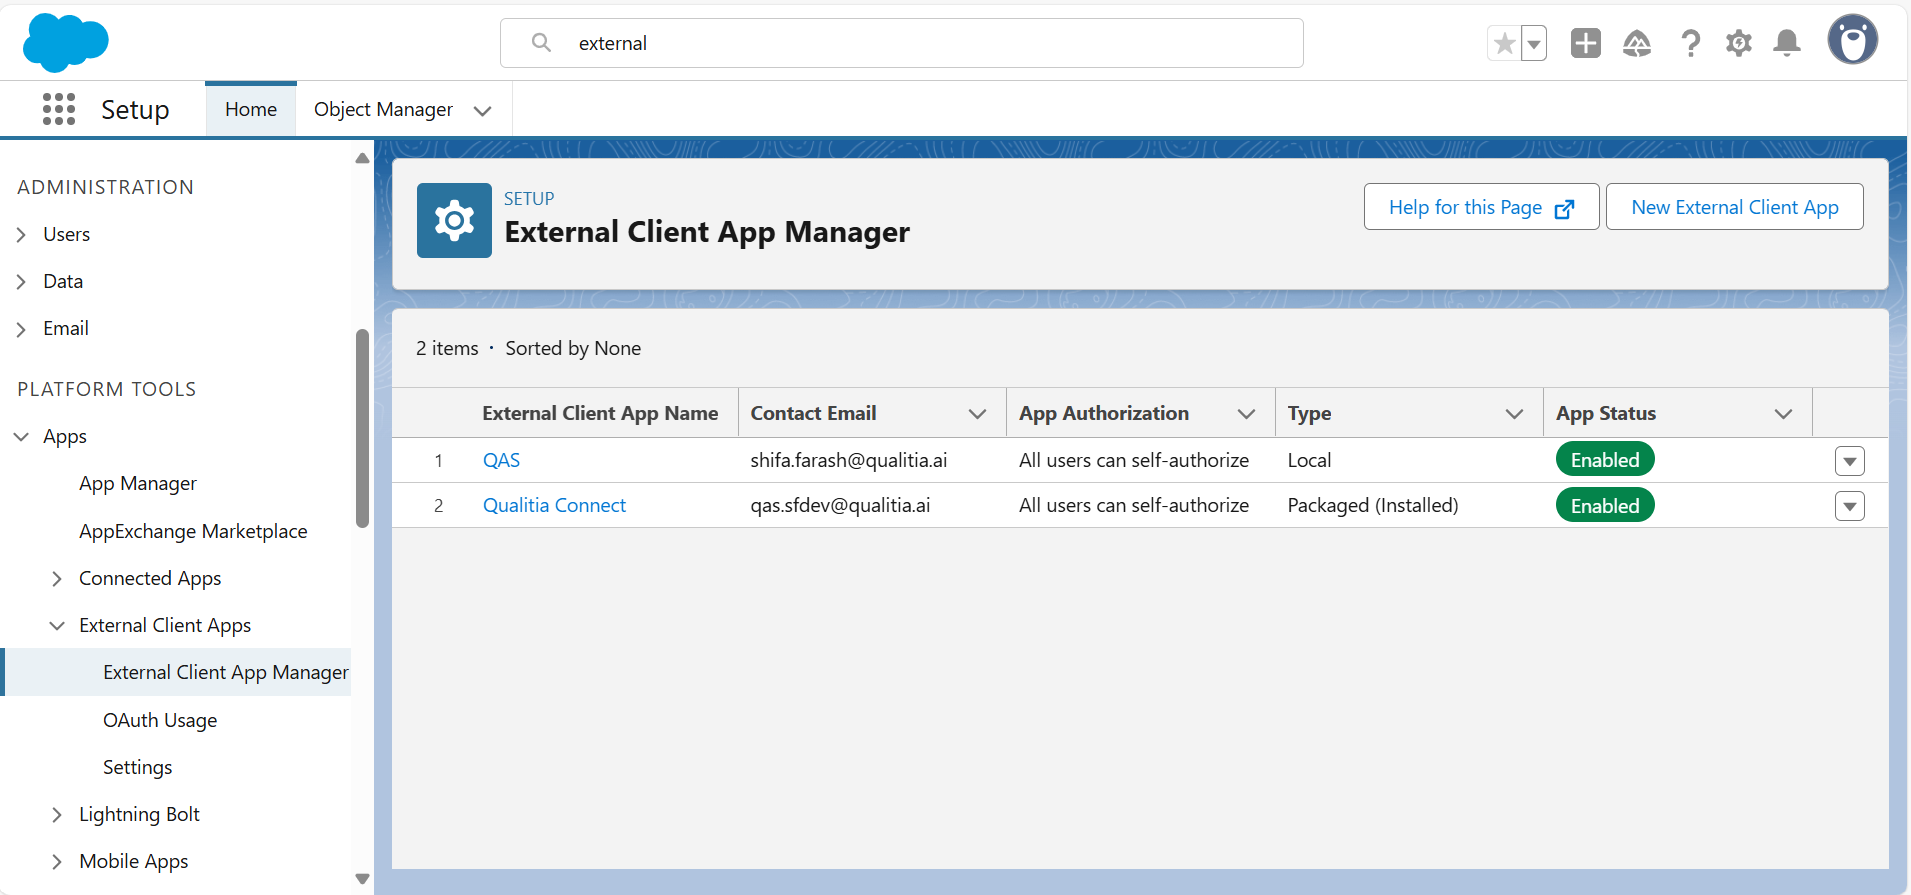
Nevigate to App Manager, click the Gear icon (⚙️) and select Setup.
In the Quick Find box, search for External Client App Manager and click.
Click New External Client App to create a new external client app.
Provide the following details:
External Client App Name: Enter a meaningful name.
Contact Email: Enter a valid contact email address.
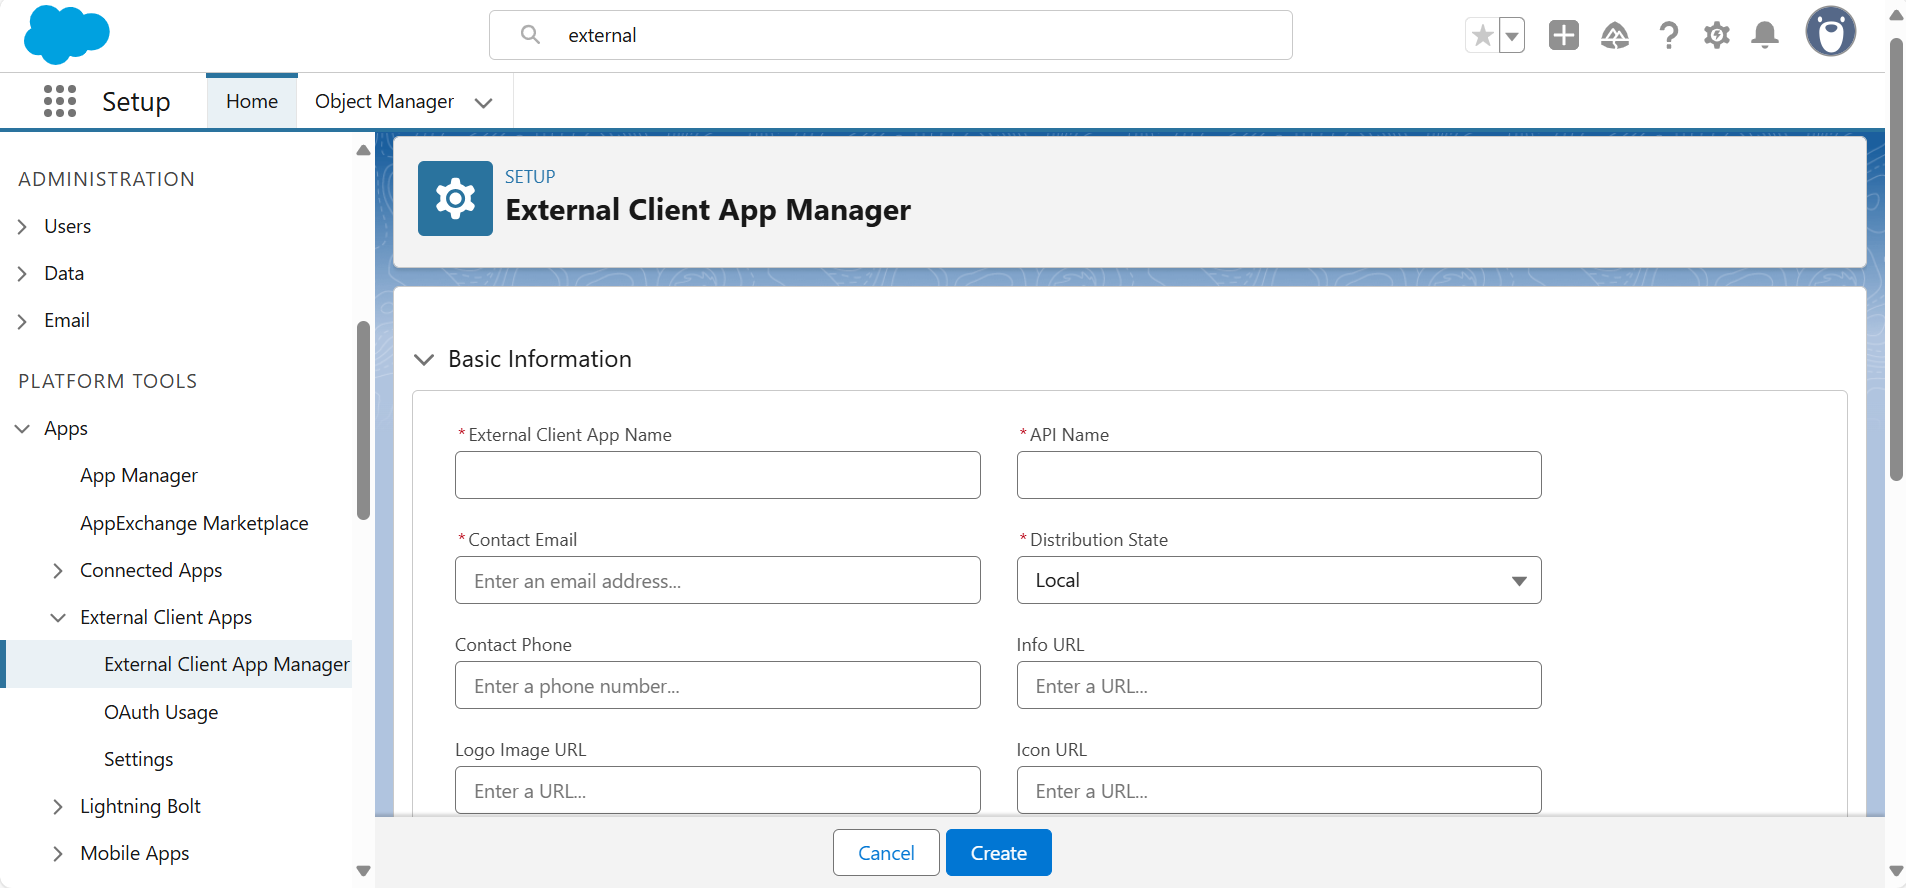
Select the Enable OAuth checkbox.
Configure OAuth Settings:
Enter the Callback URL, e.g.
https://login.salesforce.com/services/oauth2/callbackIn Selected OAuth Scopes, add the following:
Full access (
full)Perform requests on your behalf at any time (
refresh_token,offline_access)Access and manage your data (
api)(Optional): Access your basic information (
id,profile,email,address,phone)
Select the Enable Client Credentials Flow checkbox.
Click Create.
Now to Set App Policies, navigate to the Policies tab.
Click Edit App Policies.
Configure the following:
Start Page: Select OAuth
Permitted Users: Choose appropriate access level
OAuth Start URL: Provide the relevant start URL
Enable Client Credentials Flow: Ensure this option is selected
Run As: Provide the Salesforce username to run the app contextually
Click Save.
To Generate Consumer Key and Secret, go to the Settings tab and expand OAuth Settings.
Click Consumer and Secret.
Provide the required verification code when prompted.
Copy and securely store the generated Consumer Key and Consumer Secret for later use.
Edit a Connection
You can edit a connection from the Settings tab, or from the Object Repository.
Edit a connection from the Settings tab
Access Settings from left navigation to view the Settings screen. On the Settings screen, select Project Configuration.
Expand Project Configuration and click Salesforce to open Salesforce Connections screen.
On the Salesforce Connections screen, you will see the list of organization and its connections.
Click the Pencil icon at the right to edit the connection.
Update the required changes and click Connect.
If you attempt to edit the connection and change the provided Salesforce URL — which may result in a change of the organization — Qualitia will not allow the update.
A message will be displayed:
"Changing Salesforce connection will affect the organization name. Please create a new connection to proceed."
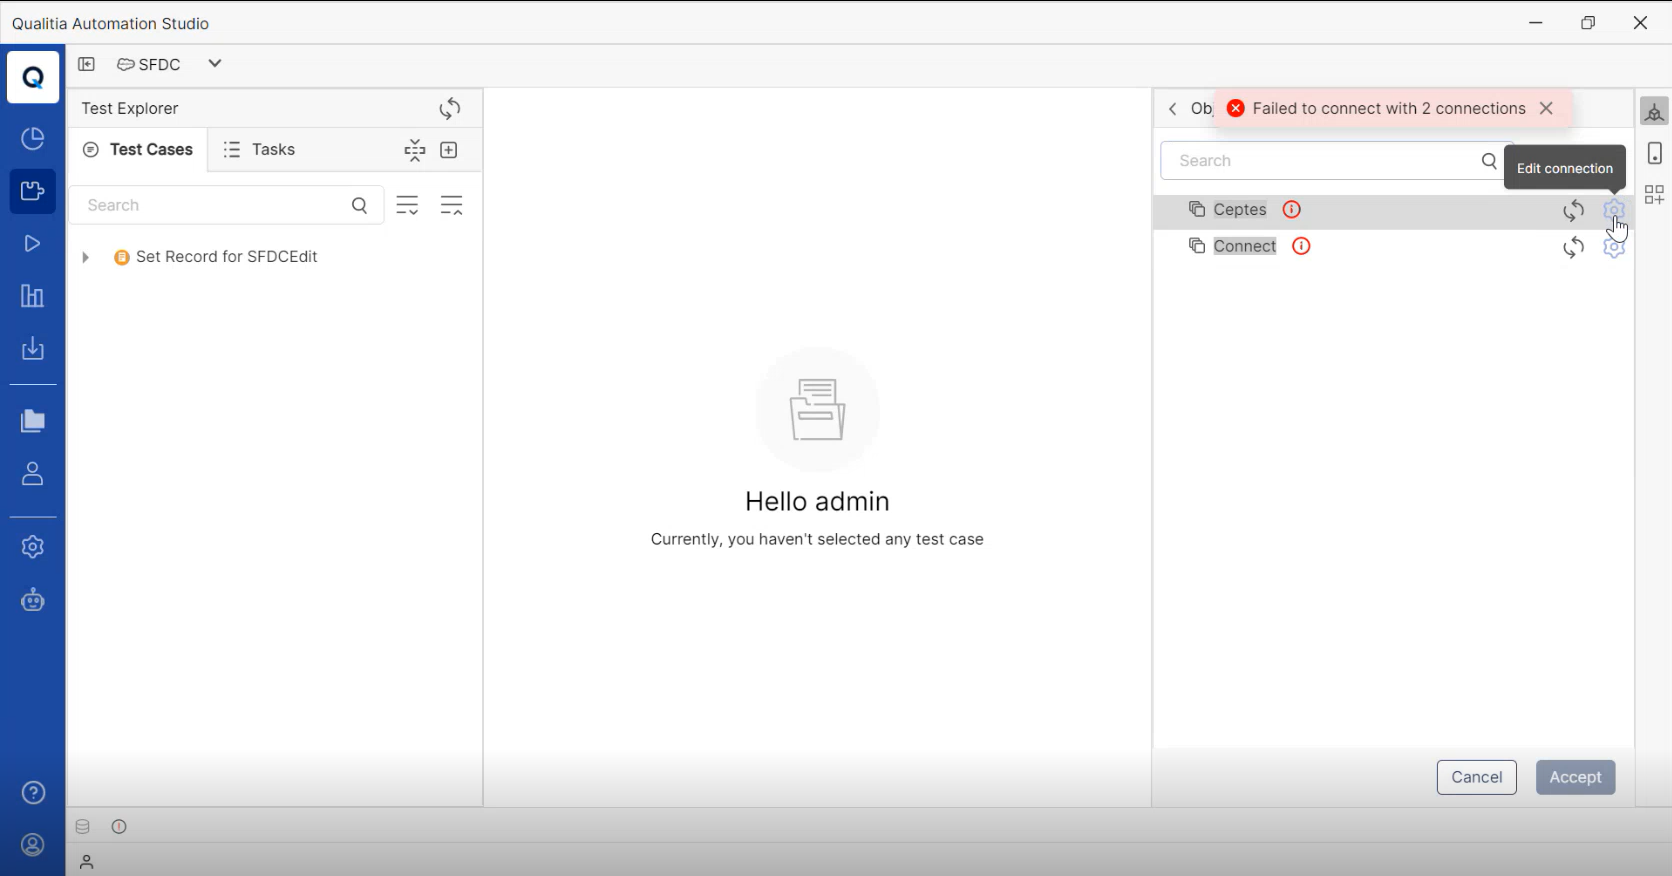
If a connect fails due to a password change or any other reason, a failed icon will be displayed next to the connection name. You can edit the connection details and attempt to connect again.
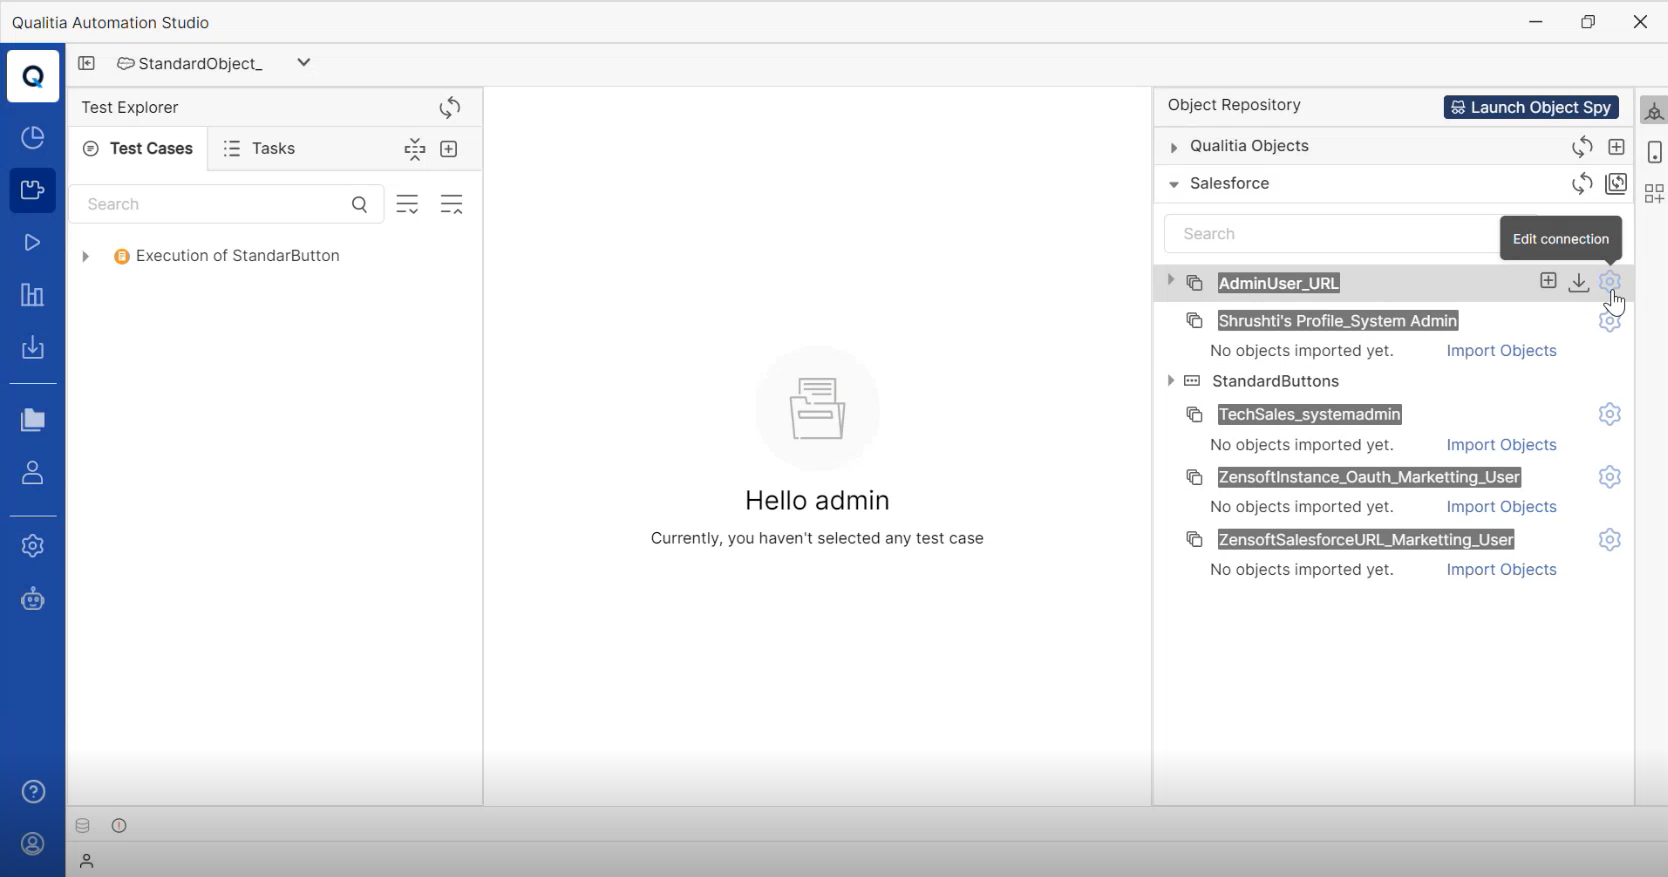
Edit through Object Repository
For Salesforce project we have two object repositories.
Qualitia Objects: The objects that are created using Recorder, Web ObjectSpy, or manual object creation will be available under this repository.
Salesforce: The objects that are obtained from Salesforce application by using the established connection can be found under Salesforce repository.
Steps to edit using object Repository:
Go to Object Repository.
Expand the Salesforce tab to view the list of the connections.
Click the Settings icon on the right-hand corner of the connection you are willing to edit.
If your password or Security Token is expired the connection will be failed. And in this case, you can edit the connection from the Change Management tab.
Delete a Connection
You can delete a connection from the Settings tab.
Access Settings from left navigation to view the Settings screen. On the Settings screen, select Project Configuration.
Expand Project Configuration and click Salesforce to open Salesforce Connections screen.
On the Salesforce Connections screen, you will see the list of organization and its connections.
Click the Bin icon at the right to delete the connection.
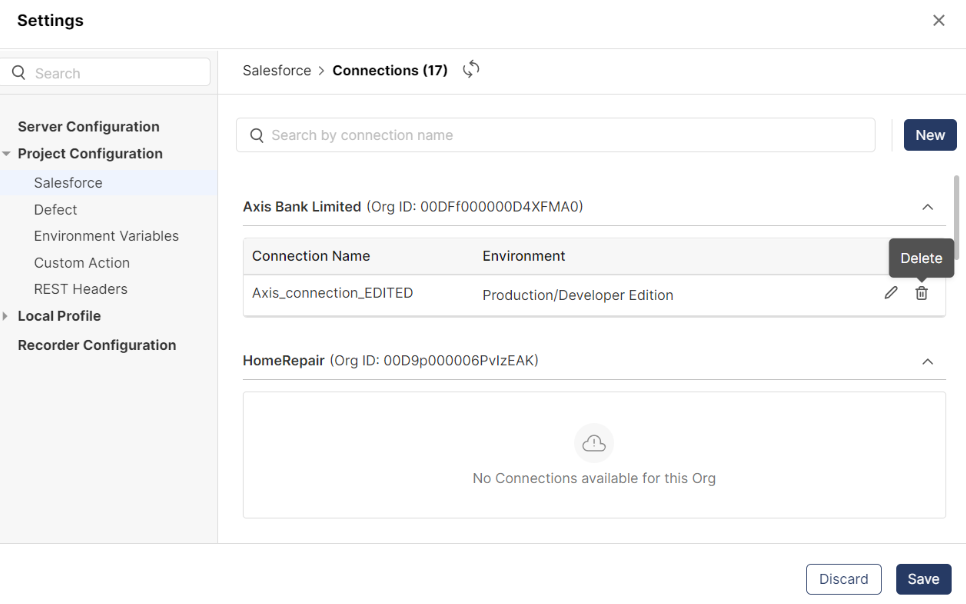
Clicking delete will open a warning popup window.

Click Delete to continue; else click Cancel.
Note: When the connect is deleted it will be shown in strikethrough until you save it.
If a connection is deleted, the associated objects will remain in the object repository but Change Management details for those objects will no longer be available.
These objects will be moved under the "Organization" category.
Once the connection is re-created, all objects previously associated with it will reappear under Change Management.
When a connection is deleted, attempting to create a new connection with the same name triggers a duplicate error.
Steps to Generate Security Token
Please generate the security token for all the users by following the below steps.
Login to Salesforce and go to Personal Settings.
In the Quick Find box, type "Reset" and click Enter.
From the search results, select Reset My Security Token.
You'll be directed to a page or option where you can reset the security token.
Click on the option or button labeled Reset Security Token.
After clicking, Salesforce will generate a new security token for you.
Check the email address associated with your Salesforce personal settings. You might have received an email containing the new Security Token.
Note down or copy the Security Token from the email.
You can now use this security token for authenticating with Salesforce or any integrations that require it.
In cases such as change password or reset token, user must regenerate the token and update the connection in Qualitia.
APIs Used
QAS uses certain APIs to get access to the application data. The following are the categories of APIs used:
Metadata APIs
Item | Description |
|---|---|
Entry Point | https://{base}/services/data/v{Version}/ |
API Access required in connected App | Metadata API Edit Access or Full access |
Reference link on all APIs | Result Objects | Metadata API Developer Guide | Salesforce Developers |
Metadata APIs
Item | Description |
|---|---|
Entry Point | https://{base}/services/data/v{Version}/ |
API Access required in connected App | API Enabled permission or Full access |
Reference link on all APIs | Versions | REST API Developer Guide | Salesforce Developers |
Connection APIs
Basic authentication
Item | Description |
|---|---|
SOAP Entry point – URL base | {{_endpoint}}/services/Soap/m/{{version}} |
API Access required in connected App | OAuth flows |
Reference link on all APIs used | API Call Basics | SOAP API Developer Guide | Salesforce Developers |
OAuth Authentication
Item | Description |
|---|---|
Entry point | |
API Access required in Connected App | Download AppExchange Packages AND Customize Application AND either. |
Reference link on all APIs used | Manage OAuth Access Policies for a Connected App (salesforce.com) |
💡 Golden Nuggets: Best Practices to Establish Connection Between Salesforce and Qualitia
There are 2 ways to Establish a connection between Salesforce and Qualitia.
Using salesforce URL- for this we need Salesforce URL, Username, Password and security token.
Using O-auth- for this we need Salesforce URL, Username, Password, Client Id, Client Secret.
🔧 Got a problem? Let’s fix!
Issue: Unable to find “Reset My Security Token” Information or “Your security token isn’t displayed in your settings or profile.”
Solution:
Qualitia Client
Standard Resolutions for the above are:Restriction enabled in connected App
Go to Setup
Search for “Manage App”
Select your connected app
Click on “Edit Policy”
In the Trusted IP Range for OAuth Web server flow section
Select “No Restriction”/ “Anyone can connect” or enter the right restrictions as per your policy.
IP Restrictions in the Login IP Ranges
For the Reset My Security Token option to appear you will need to remove the Login IP Ranges or change the User to a profile that does not have Login IP Ranges listed.
In Salesforce Classic
Unlimited, Performance or Enterprise, system administrators can verify if there are IP values in the Login IP ranges by selecting:
Setup -> Manage Users -> Users -> Profile -> Profile name -> Login IP Ranges.System administrators can verify if there are IP values in the Login IP ranges by selecting:
Setup -> Security Controls -> Session Settings.Remove the IP ranges if required.
In Lightning Experience
System administrators can verify if there are IP values in the Login IP ranges by clicking going on the gear icon:
Setup Home -> Users -> Profiles -> select the profile name -> Login IP Ranges.System administrators can verify if there are IP values in the Login IP ranges by clicking going on the gear icon:
Setup Home -> Security -> Session Settings.
Network Access is missing
System administrators can confirm if Network Access is missing by following these steps:
Go to Setup
On the Quick Find box, enter Network Access.
Login Challenge Enabled
Login with API Token
ORDelete the IP address range in the network access.
Forcefully reset by hitting the following URL:
§ /_ui/system/security/ResetApiTokenEdit
Not able to load the SFDC project after an upgrade: If you are not able to load the SFDC project after an upgrade to Qualitia’s latest version, you need to delete the Workspace folder. You can find the workspace folder on the below path: C:\Users\user1\AppData\Local\Qualitia Automation Studio - Client\workspace.
Newly added objects are not visible on Import model: If you are not able to find a newly added object on the import model, while creating an object create it as mandatory and save. Once the object is saved, make it non-mandatory, as only mandatory fields are visible on the Import modal. This will make the object visible and ready to be used.
The Check operation for the imported SFDC Checkbox object failed, it displays a pass result in the report: If the Check operation for the imported SFDC Checkbox object is failed then the result displayed in the report should be fail. However, if you are getting a pass result, try the execution with indexing.
Error while fetching objects for connection: If you are getting the error message Error while fetching objects for connection, while importing the objects, make sure to enable the Client credential flow on the Connected App.
Note: You can also connect using OAuth Client Credential to avoid such errors.Blank screen while using mobile recorder: While using mobile recording on the Salesforce app, a blank screen appears on the login page, making it difficult for the user to record objects.
Solution: To learn the objects on such blank pages, users should hover over the screen until the objects get highlighted with a border. By clicking on the highlighted objects, users can successfully capture and learn them.
📞📚 Here to Help: Support and Resources
If you have questions that are not addressed in the documentation, you may raise them in the Qualitia Community.